This is one of the two raids which should be in the Forge of Gods DLC. The other raid, Kell of Gods, is Fallen themed, and located on Jupiter's icy moon, Europa. You will find it on the [url=https://www.bungie.net/en/Forum/Post/164714613/0/0/1][b]Forge of Gods activities[/b][/url] post.
Collapse of the Empire is a Cabal raid on Phobos. After you foil the emperor's plans to destroy the last city on Earth, he and the rest of his army retreat to Phobos. He could be plotting anything. With the dark powers he stole, who knows what he is capable of? Your objective is to slay the emperor, gutting the Cabal empire once and for all.
[url=https://www.bungie.net/en/Forum/Post/166252573][b]Raid gear[/b][/url]
[b]Recommended light level[/b]
Normal:
Hard:
[b]Relic[/b]
[spoiler]
Name: Warhammer
RT (Xbox): Doing this swings your hammer side to side, kind of like the RB (Xbox) attack for the sword of Crota. The only difference is the hammer is a lot slower, but does way more damage (it wrecks phalanxes).
RB (Xbox): Doing this jabs the handle out at enemies. If you use this attack on a [b]charged[/b] psion burner, the relic gets its super immediately.
LT (Xbox): Doing this blocks attacks, much like the sword in the heavy weapons slot. It also completely negates phalanx shield attacks, staggering them in the process.
Super: The hammer glows orange as you slam it into the ground. This causes massive damage to all enemies touching the ground within a decently large radius of the guardian who wields it.
[/spoiler]
[b]Areas/Sections[/b]
Stockade
[spoiler]
[b]Objective:[/b] Breach the wall
[url=http://i.imgur.com/DTPr158.png][b]Official Behemoth Tank concept art[/b][/url]
[b]Description:[/b] The start of the raid is an open area with vehicles. There is a big wall, protecting a huge fortress. There is a massive tank-like vehicle, guarding the entrance of the wall. It's called a Behemoth Tank, and it has 6 thrusters. It is also much bigger than a Goliath Tank. There are two Colossi standing on top of the Behemoth Tank. At first these are the only enemies (besides the tank, of course). You will need to take them out, or they will cause severe problems.
There is a much smaller outpost nearby, with Cabal vehicles. There are heavy interceptors(a lot like Halo warthogs). and bombers(a lot like Halo Reach falcons, but the pilot can drop a bomb).
It is recommended that one person gets into the bomber, 4 people get into heavy interceptors, and the last person stays on foot to kill adds. There are 6 thrusters on the Behemoth Tank, and they can only be harmed by the turret of a heavy interceptor. The thruster of a Behemoth Tank will regenerate after 30 seconds of it being destroyed. You will need to destroy them quickly, so it is highly recommended that you have a heavy interceptor on the left side, and another on the right side.
Once all 6 thrusters are destroyed, the top of the tank will open up, exposing its power core. You will need to drop a bomb inside to hurt the tank. You will need to do this process 3 times in order to kill the behemoth tank.
If you fly the bomber over the wall in an attempt to skip the Behemoth Tank, you will be eradicated by a barrage of anti-air artillery with flawless aim. Just kill the Behemoth tank. There's no way around it (unless someone finds a cheese).
[/spoiler]
Ghra'urn's Firewall (darkness zone)
[spoiler]
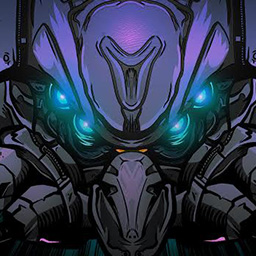
[b]Objective:[/b] Defeat Primus Ghra'urn
[url=http://i.imgur.com/9grngpO.jpg?2][b]Map[/b][/url]
[url=http://i.imgur.com/chosx7D.jpg?2][b]Map Key[/b][/url]
[b]Description:[/b] You go into a rectangular room. There is a ledge with a turret at the back center of the room. On each side of the ledge, there is a staircase. The entire top floor consists of flame panels (the same kind that are in the Shield Brothers strike). At the front center of the room, there is a panel with 9 tiles. Step on any of the panels to initiate the boss fight. On the wall at the front of the room, there is another square above the door, also split up into 9 sections (because it's on a wall, you can't see it in the picture).
A huge door at the front of the room opens, and Primus Ghra'urn flies out, unleashing a mighty roar. In his right hand, he wields a mace (the kind you swing on a chain) made entirely out of energy. His left arm is a shield arm, like Valus Mau'ual from the Shield Brothers strike. Ghra'urn also has 2 turrets on his back (one on each shoulder) that shoot centurion projectiles. Unlike most cabal, who's helmets have 2 eye slits and a gas mask, Primus Ghra'urn has a red visor and black armor. He also has a white energy shield, just like a Court of Oryx boss. His shield can only be damaged by the turret.
The moment he flies out of that door, the all of the flame panels upstairs activate, preventing anyone from manning the turret. The terminal on the front wall starts 3 patterns. each pattern consists of 2 random squares lighting up at a time. One is red and one is blue. The blue one indicates which tile of the panel the hammer guy stands on. The red on indicates which one has to be hit with the hammer's super.
After you summon Primus Ghra'urn, troops start spawning on the lower floor, accompanied by a special type of centurion called a berserker. Berserkers wield the warhammer relic, just like a swordbearer wields the sword of Crota. Once you pick up the hammer, psion burners start to spawn on the top floor, walking on the flame vents. You will get a notification that says, "The burners are absorbing solar energy". Then they start to glow orange, just like a Sunbreaker titan. Charged psion burners are very dangerous because they can shoot large fireballs that explode, which replaces their usual arc blasts.
The person with the warhammer has to use the RB(Xbox) attack to kill one of the charged psion burners to get the super immediately. Then they have to go to the panel and do the first sequence you saw on the front wall. You will have to do this 2 more times in order for the next phase of the fight. If you do any of the sequences incorrectly, a red light at the bottom of the turret ledge will light up, and you will have to start the sequence all over again. If all 3 red lights activate, the screen turns red, and everyone dies.
While the hammer guy does this, 2 people need to take turns distracting Primus Ghra'urn. The rest of the team needs to focus on killing enemies. Primus Ghra'urn gets distracted very easily, and it only takes 2 or 3 shots to get his attention.
Once the person with the warhammer does all 3 sequences correctly, the hammer disappears and flame panels on the top floor deactivate, allowing you to use the turret.
Primus Ghra'urn has two different types of mace attacks. One involves just swinging the mace, and one involves swinging the mace while jumping. Whenever he does the jumping attack, his mace gets stuck in the ground, and he will struggle for 15 seconds to get it out. That's your chance to take down his shield with the turret so your team can do DPS (a great place to do DPS is the stairs).
The person in the turret will see a countdown timer.The turret guy will need to get out of the turret [b]before[/b] the timer hits 0. Once it hits 0, the flame panels on the top floor will re-activate, Primus Ghra'urn's shield will recharge, and there will be 3 more sequences that appear on the square on the wall. You have to repeat these steps until you kill Primus Ghra'urn.
You need to kill him quickly because the bottom floor is covered in square tiles (Do not get these confused with the tiles in the sequence plate. They're completely different.). Whenever Primus Ghra'urn gets his mace stuck in the ground and pulls it out, a tile is removed, exposing a flame vent underneath. These hidden flame vents never turn off during the boss fight, but they will once you kill Ghra'urn. If your team takes really long to kill Ghra'urn, there will not be many safe areas to stand on.
If Primus Ghra'urn enrages, it takes no time for him to pull his mace out of the ground. He'll just rip off tiles like there's no tomorrow. Like every raid boss, make sure to kill Ghra'urn [b]before[/b] he enrages.
On hard mode, after you get out of the turret, you'll have the status condition known as [u]Operant's Lock[/u]. This prevents you from getting in a second time. On every time the turret is used on hard mode, a different person has to use it. If you are running hard mode, and Ghra'urn is at half health or less, the projection rifle turrets mounted on his shoulders, will start to fire.
Challenge mode: Nobody can hold the relic more than once. Prevent Ghra'urn from removing any tiles on the back half of the room. This is a lot easier than it sounds. You just need to shoot him a few times, and he charges at you. If you're the turret guy, whatever you do, don't shoot him. And make sure people are distracting him.
[/spoiler]
Unfortunatelly, since this raid is too long, I can't fit it in one post. I apologize that it's not all in one place. :/
[url=https://www.bungie.net/en/Forum/Post/180838870][b]Part 2[/b][/url]
[url=https://www.bungie.net/en/Forum/Post/181287303][b]Part 3[/b][/url]
Your role as a moderator enables you immediately ban this user from messaging (bypassing the report queue) if you select a punishment.
7 Day Ban
7 Day Ban
30 Day Ban
Permanent Ban
This site uses cookies to provide you with the best possible user experience. By clicking 'Accept', you agree to the policies documented at Cookie Policy and Privacy Policy.
Accept
This site uses cookies to provide you with the best possible user experience. By continuing to use this site, you agree to the policies documented at Cookie Policy and Privacy Policy.
close
Our policies have recently changed. By clicking 'Accept', you agree to the updated policies documented at Cookie Policy and Privacy Policy.
Accept
Our policies have recently changed. By continuing to use this site, you agree to the updated policies documented at Cookie Policy and Privacy Policy.