I don’t expect anyone to remember, but I used to make Strike and Raid ideas back in ye olde Destiny 1 days. I also made 2 Strikes in D2, but lost motivation. Fast forward a few months, and here I am again 😂 Btw this Strike idea is a rework of one of those 2.
Anyways, brief explanation: this Strike, like the Adventure, “Invitation from the Emperor,” would lead into the Leviathan Raid. Doing this Strike and the Adventure would unlock the Raid.
[b][u]Seeker’s Test[/u]: Cabal Strike[/b]
[b][u]Location[/u][/b]: Firebase Hades, European Dead Zone, Earth
[b][u]Description[/u][/b]: "A newly-rallied Red Legion, working together with a new Cabal force, is invading the European Dead Zone, compromising Deverim Kay's position. Save Kay, and find out who's now leading the Cabal."
[b][u]Part 1: The Assault[/u][/b]
[spoiler]Players spawn in Outskirts, outside Trostland. They see several Cabal ships swarming all over the place, and are immediately met by Red Legion and Loyalist Cabal forces working together.
Ghost: "I've received a distress signal from Kay. He's still at the church."
Kay: "Mayday! Mayday! This is City scout Deverim Kay, I'm trapped in the old town of Trostland by an invading Cabal force. They've found my position and are attempting to force me out, any and all backup requested!"
Ghost: "We need to move, now!"
The players fight through the Cabal, making their way to Trostland. What’s odd is that both Red Legion Cabal and Loyalists from the Leviathan are both attacking. Eventually, they reach the area outside the church, which is surrounded by several Cabal tanks and units. Suddenly, sniper shots begin killing Cabal.
Hawthorne: "This is Hawthorne, I read you, Kay. Are you still in the church?"
Kay: *sounds of gunfire, struggle* "Yes, but several Legionaries are rushing me! Get in here and fend them off!"
Players rush into the church, clearing out all hostiles. Once done, they talk to Kay in person.
Kay: "Thank you, Guardians. I'm not sure if I could've made it out of there alive without a little help. Anyways, I'm thinking the Cabal attacked with a purpose. That was way too coordinated to just be random. That attack was strategized. Someone is leading them, and I think I know where to look. I'll mark it on your map for you."
A new map marker appears on the HUD, and players follow it.[/spoiler]
P[b][u]art 2: Firebase Hades[/u][/b]
[spoiler]The marker leads players from Trostland back to Outskirts, through Winding Cove, and leading to Firebase Hades.
Ghost: "So, Kay, what are we looking for here?"
Kay: "If the Cabal have a new leader, and they are indeed there, they’ll probably be operating from an underground bunker, since most Cabal bases tend to be built like that. Look for an elevator, or stairs, or some way to get underground."
Players search the base, while dealing with Cabal. Eventually, they find an elevator, and use it. It takes them to the lower levels, and stops at a room called "Hades Command Center". A big computer monitor sits off to the side of the elevator exit.
Ghost: “Let me scan that computer to get a feel of the place.”
Ghost scans it.
Ghost: “Well, whoever took charge recently has been busy around here. Planned agenda includes: repairing the artillery cannon we destroyed, repairing the anti-air guns we destroyed, delivering new fuel to replace what we destroyed, essentially repairing and/or replacing our damages.” *laughs* “However, there’s also plans to immediately go on the offensive if ‘the Light Worshippers are not worthy.’ Not worthy of what?”
Kay: “Sounds troubling. Good thing you came when you did.”
Ghost: "I think we found what we're looking for. I have the place mapped out, so I know where we need to go.“
Players are navigating the base and encounter more Cabal, but they don’t attack. They instead holster their weapons and line up along the walls leading to a door.
Ghost: “Um... okay? They’re not attacking.”
Kay: “I wouldn’t trust them. Keep your wits about you.”[/spoiler]
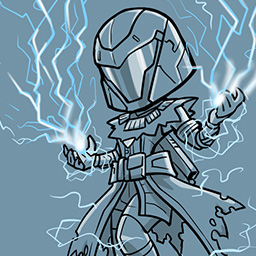
[b]Part 3/[u]BOSS FIGHT[/u]: Bu'ulara, Seeker of the Worthy/Molossus, Seeker’s Fang[/b]
[spoiler]Players enter Arena of the Worthy, a massive underground arena. A female’s voice speaks over the intercoms.
Bu’ulara: “Greetings, Light Worshippers. I hear that you eliminated the traitorous leaders of the Red Legion, Ghaul and Consul. For that, I and the Emperor both applaud you. Thanks to your efforts, the Emperor can successfully begin the reclamation of his rightful throne. For that, we wish to offer you an invitation to join our ranks. But first, you must be tested with a challenge.”
Suddenly, a giant Cabal Gladiator in Loyalist attire (white/purple/gold colors) with tusks poking through her helmet named "Bu'ulara, Seeker of the Worthy" jumps down to the ground. Alongside Bu'ulara, a War Beast named "Molossus, Seeker’s Fang" appears. Molossus looks like a Royal Beast boss from the Leviathan Raid.
Ghost: “Challenge accepted!”
The bosses both have yellow health bars, and can both be killed. During the initial attack, no adds assist them. Both of them will attack like normal Gladiators and War Beasts. However, after damaging Bu’ulara enough, she will stumble and fall to her knees, screaming in pain.She will then shout:
Bu’ulara: “Molossus! Finish them!”
When she says that, Molossus will begin howling (like the Raid Royal Beasts) for 30 seconds. During the howl, Bu’ulara becomes invincible, so players must attack Molossus. If not enough damage is dealt to Molossus within 30 seconds, the howl will wipe the Fireteam. However, if enough damage is dealt, then Molossus will abruptly stop, stumbling and whining. Afterwards, Bu’ulara will get back up, and they both will attack. Regular Cabal adds - both Loyalists and Red Legion - will then appear to assist the bosses. That process will be repeated a few times.
One attack that leaves Bu'ulara open to damage is when she leaps in the air and slams the ground. She will land and rest on her knees for a few seconds, exposing her weakspot on her back.
After fighting for a while, when either Bu'ulara or Molossus die first, the other will become "Enraged", increasing their attack output. If Bu’ulara dies first, Molossus will do one last howl that must be stopped, and then attack again until death. If Molossus dies first, Bu’ulara will attack more frequently, never stumbling or resting. Once both bosses are dead, the Strike is over.
Kay: “Nice work! Wait, the Gladiator’s still alive!”
Players approach Bu’ulara, who is mumbling quietly.
Bu’ulara: *laughing* “My lord, they are worthy. They’re....worthy...” she passes out, dead.
Kay: “What does she mean you’re ‘worthy’?”
Ghost: “I’m not sure, but it could have something to do with that massive ship that came to Nessus’s orbit recently. But whatever, let’s get out of here.”[/spoiler]
And yes, there are Strike rewards and Lore. Click the link below to go to another post to see them.
Link: https://www.bungie.net/en/Forum/Post/243761230/0/0
And that’s it. Thanks for the read. If you want to see more, just let me know. I’ll take suggestions.
Es ist dir nicht gestattet, diesen Inhalt zu sehen.
;
Respektlosigkeit/Hassrede
Respektlosigkeit/Hassrede
Belästigung/Persönliche Angriffe/Mobbing
Namentliches Anprangern/Verstoß gegen Privatsphäre
Explizite Gewalt/Explizite Sexualität
Gewaltandrohung/Illegale Aktivität
Politische/Religiöse Diskussion
Cheaten/Hacken
Spoiler/Vertrieb gestohlener Inhalte
Hausieren/Plagiat/Phishing/Identitätsbetrug
Störung/Hinterziehung
Respektlosigkeit/Hassrede
Respektlosigkeit/Hassrede
Belästigung/Persönliche Angriffe/Mobbing
Namentliches Anprangern/Verstoß gegen Privatsphäre
Explizite Gewalt/Explizite Sexualität
Gewaltandrohung/Illegale Aktivität
Politische/Religiöse Diskussion
Cheaten/Hacken
Spoiler/Vertrieb gestohlener Inhalte
Hausieren/Plagiat/Phishing/Identitätsbetrug
Störung/Hinterziehung
Deine Rolle als Moderator befähigt dich, diesen Benutzer sofort von den Nachrichten zu sperren (die Berichtsabfrage wird also umgangen), wenn du eine Strafe auswählst.
7-tägige Sperre
7-tägige Sperre
30-tägige Sperre
Permanente Sperre
Diese Seite verwendet Cookies, um dir die bestmögliche Benutzererfahrung zu bieten. Wenn du auf „Annehmen“ klickst, stimmst du den Vereinbarungen unter Cookie-Richtlinie und Datenschutzerklärung zu.
Annehmen
Diese Seite verwendet Cookies, um dir die bestmögliche Benutzererfahrung zu bieten. Wenn du diese Seite weiter nutzt, stimmst du den Vereinbarungen unter Cookie-Richtlinie und Datenschutzerklärung zu.
close
Unsere Vereinbarungen haben sich kürzlich geändert. Wenn du auf „Annehmen“ klickst, stimmst du den aktualisierten Vereinbarungen unter Cookie-Richtlinie und Datenschutzerklärung zu.
Annehmen
Unsere Vereinbarungen haben sich kürzlich geändert. Wenn du diese Seite weiter verwendest, stimmst du den aktualisierten Vereinbarungen unter Cookie-Richtlinie und Datenschutzerklärung zu.